Split from the old HAPPY topic!
I installed a few mods on the printer. First of all, I installed a MOSFET board in the power supply so that the hotbed connector wouldn't melt and shit. That's a big problem with Melzi boards, apparently. The connectors on the Wanhao (and its clones) have been revamped over time, but the connector that comes with it still isn't quite good enough.
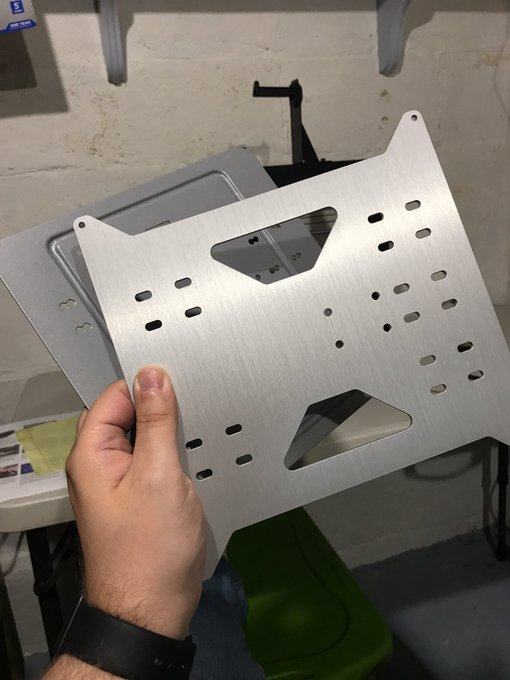
First off, I bought a Y carriage plate to replace the stock part, which was a really thin part) stamped sheet metal, I believe) that has a nasty tendency to warp and bend. Even my printer, which only has a few days of printing time, is showing some signs of warping. The replacement is much thicker (as thick as the heated bed, actually), is lighter, and is made of aluminum. As an added bonus, the Y motion is much quieter than it used to be as a result, and the bed is more level. Here's a pic of the replacement, as well as the new part. Should have done a side view, but oh well.
More recently (read: yesterday) I installed a pair of Z braces:

The printer is shipped in two pieces that must be assembled--the crossbeam with the extrusion unit (covers the X and Z axes), and the base that contains the bed (which covers the Y axis). The only thing holding those two pieces together are some wires and a few screws, so as the printer moves the crossbeam will flex a bit. In addition, it naturally sits at a slight angle--I estimate somewhere around 87 degrees. The Z braces prevent the wobble (which has already resulted in significantly better infill) and is keeping the two pieces at a 90 degree angle, so keeping the bed level has gotten a whole lot easier.
There are two more upgrades currently on the docket, both of which will happen at around the same time. First, I ended up ordering a Flexion HT kit. The extruder itself is pretty badass and will allow me to successfully extrude flexible materials. That should be fun to play with! Additionally, it includes two new hot ends--a normal one and a high temperature one. The high temperature one lacks a PTFE tube, so it can safely reach temperatures of 290-300C. That'll allow me to print just about everything, barring the really exotic stuff like PEEK, PAEK, and ULTEM (the 350-400C range is a bit scary to me, given that this isn't exactly an industrial grade machine I'm dealing with).
The second is an improved cooling solution. The 20mm fan included on the Wanhao i3 is subpar for PLA printing. On even small overhangs the print tends to get a bit messy (
896846809921880064[/tweet]]here's a video of me blabbing about it). Additionally, since it blows from the front back, parts near the back of the print tend to sag a bit more. I've seen this happen on both prints that I've done for
Aquaticus the Water Dragon, for example. There's minor sagging on her right head fins, but her left fins (and, in fact, the rear left of her head in general), which are situated toward the back of the bed, receive inadequate cooling, so the layers tend to sag in the time between extrusion and solidification.
I have a roll of red (gotta match the Flexion!) PETG filament and a 50mm blower fan on the way, so after I get that and the new extruder/hotend installed I'm going to try printing and installing the
DiiiCooler. The larger fan will be capable of blowing more air--I might actually have to turn it down on lower layers!--and the cooler itself is designed so that the air is distributed
around the print rather than simply being directed from front to back. That's likely going to be one of the more important upgrades that I wind up doing.
Oh, on the subject of practical prints, I printed a mount for my shiny new third Oculus sensor (rear right):
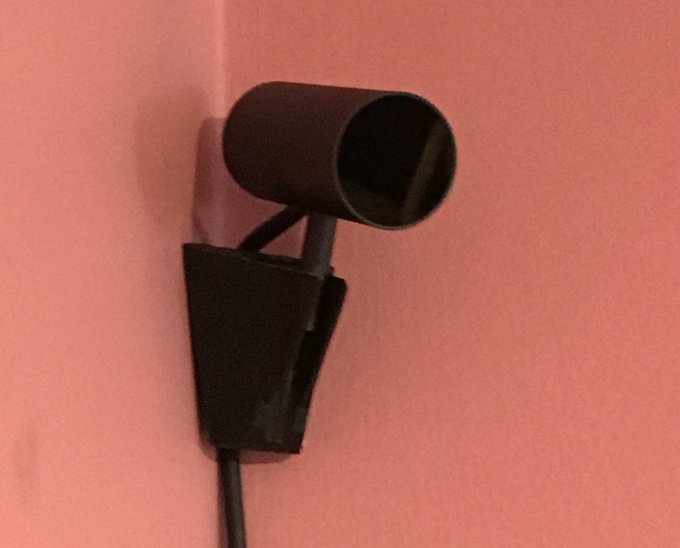
I used
this design. I'm planning to mount my front right to the wall as well, since I could use better low-height tracking for SteamVR stuff. Currently debating whether I should bother designing it or just looking for an already-existing non-corner wall mount.

As for my front-left one, I'm debating on whether I should mount it to my entertainment center or ceiling-mount it. We'll see!


